Mango ice cream is the quintessential flavor of summer, offering a vibrant, sun-drenched escape in every single spoonful. This specific recipe focuses on achieving that elusive, professional “scoop-shop” density without the need for an expensive electric churner.
By utilizing the synergy between frozen fruit solids and high-fat dairy, we create a mango ice cream that is remarkably stable and resistant to icy crystallization. You are about to master a dessert that looks as stunning in a matte white bowl as it tastes on a warm afternoon.
The secret to this mango ice cream lies in the “Golden Trio” of ingredients: concentrated mango puree, chilled heavy cream, and sweetened condensed milk. Together, they form a silken base that carries the floral, honey-like notes of ripe mango perfectly across your palate.
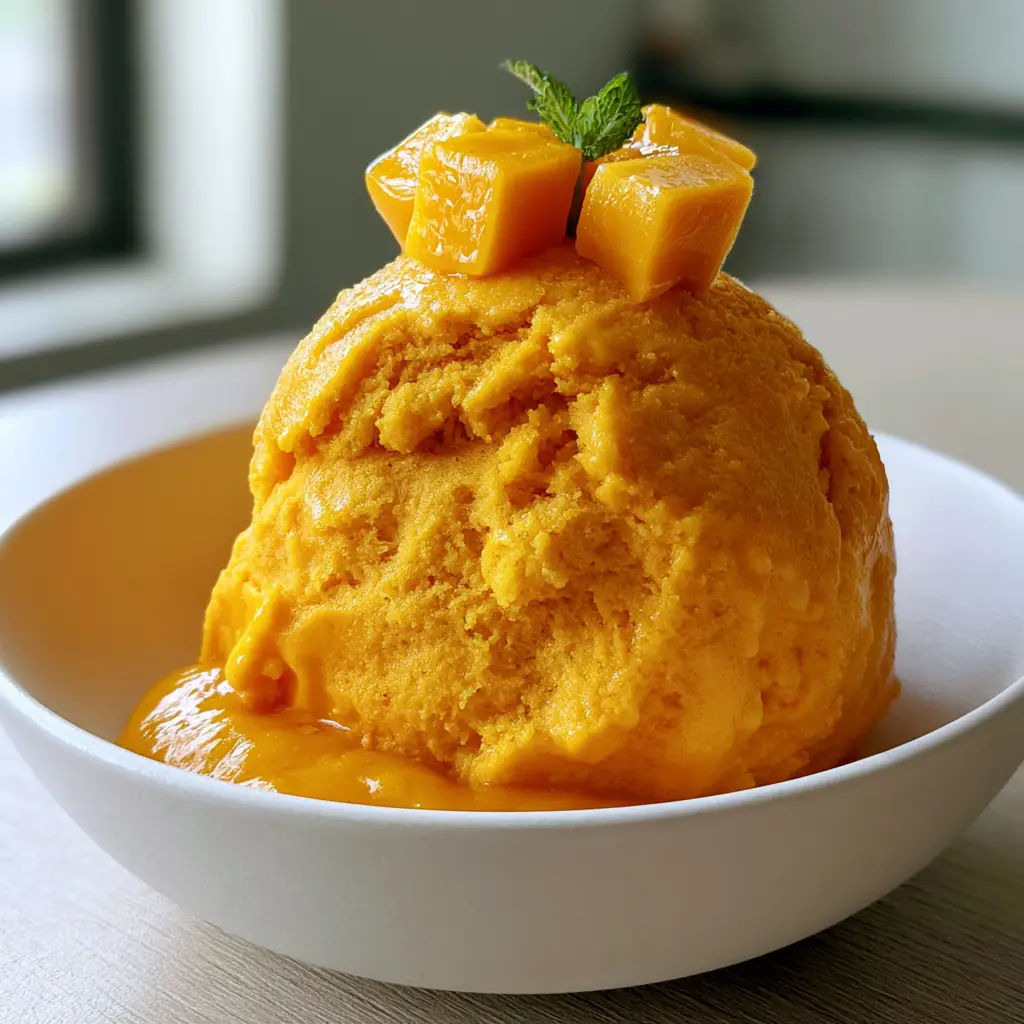
The Anatomy of a Perfect Golden-Orange Scoop
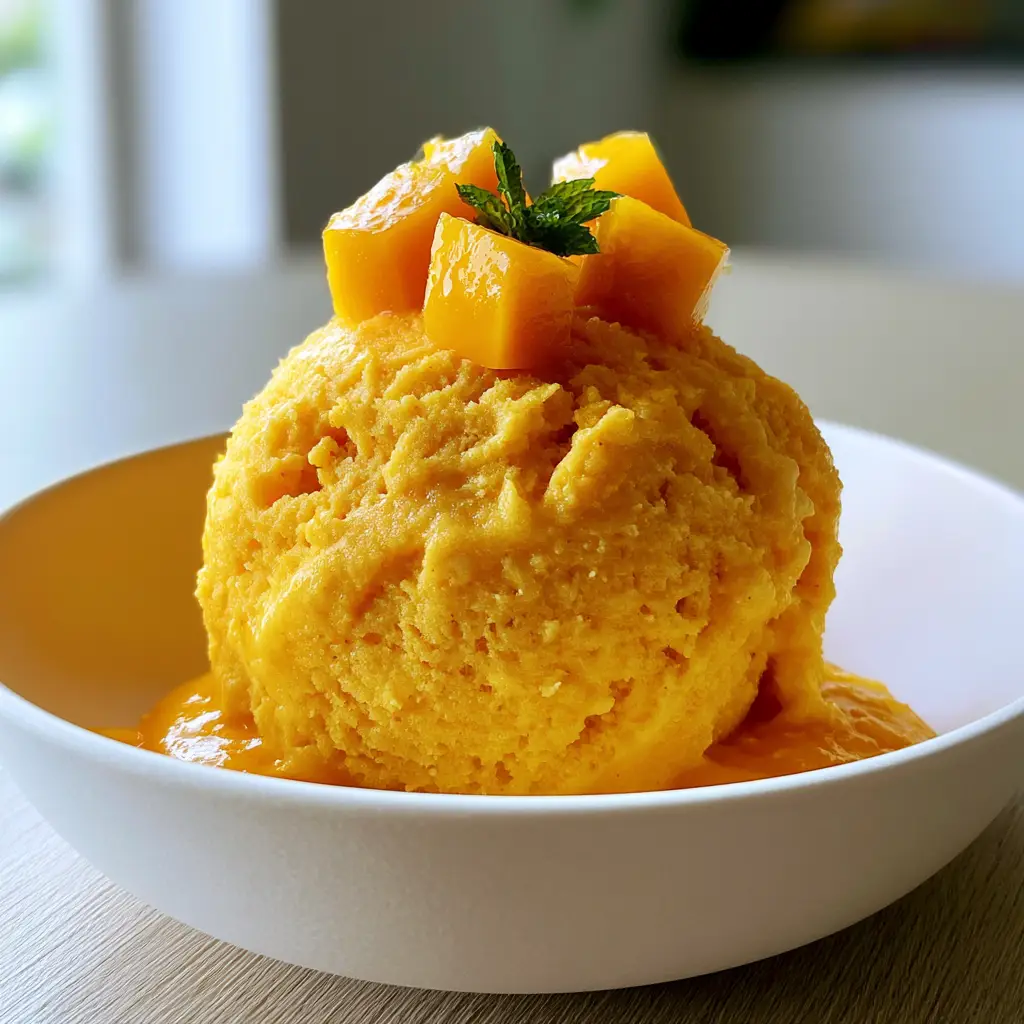
- Dense and Velvety Texture: Unlike airy, ice-milk varieties, this version produces deep scoop-drag marks and a professional sheen that signals pure luxury.
- Vibrant Natural Color: We rely on the high-pigment concentration of frozen mango puree to achieve that signature golden-orange hue without any artificial dyes.
- Double Mango Experience: By combining a smooth, infused base with a thick puree drizzle and fresh glistening cubes, we hit multiple sensory notes simultaneously.
- Visual Precision: This recipe is designed to match a high-end aesthetic, featuring precise mango cubes and a singular, delicate mint leaf for a pop of contrast.
Creating this mango ice cream is an exercise in patience and temperature control, ensuring that the final product is smooth enough to glide through a professional scoop. If you enjoy this tropical profile, you might also find yourself craving other refreshing treats like refreshing fruit mochi or even a chilled homemade lemonade.
Essential Ingredients for a Silken Tropical Base
Frozen Mango Puree (480ml / 2 cups): Using frozen puree ensures the base stays ultra-cold during the mixing process, which is the secret to a finer crystal structure. It provides the intense “golden-orange” color and the primary flavor profile of our mango ice cream.
Chilled Heavy Cream (480ml / 2 cups): With a minimum of 36% milk fat, this ingredient provides the structural aeration needed for a light yet dense mouthfeel. Ensure it is bone-chilled before whipping to achieve the stiff peaks required for a velvety finish.
Sweetened Condensed Milk (397g / 14 oz): This acts as our primary sweetener and an anti-freeze agent, lowering the freezing point so the mango ice cream remains scoopable. Its thick consistency contributes to the “dense and velvety” texture described in the visual blueprint.
Fresh Ripe Mango (1 large fruit): You will need this for the “four small, precise cubes” and the “glistening” garnish that crowns the final scoop. Choose a fiberless variety like Alphonso or Ataulfo for the most professional appearance and flavor.
Fresh Mint Leaves (1 small sprig): A tiny, vibrant green garnish that provides a visual and aromatic counterpoint to the deep orange of the mango ice cream. It is the final “chef’s kiss” that elevates the presentation from home-style to gourmet.
Pinch of Fine Sea Salt (1g): An invisible but mandatory foundational ingredient that cuts through the sugar and heightens the natural floral notes of the mango. Without it, the sweetness can feel one-dimensional; with it, the flavors truly sing.
The Pro-Kit: Equipment for Perfect Presentation
To achieve the “macro handheld” quality of the perfect scoop, you will need a high-quality, heavy-duty ice cream scoop with a trigger or a sharp-edged metal spoon. This allows you to create those beautiful, visible drag marks in the mango ice cream.
A high-speed blender or food processor is necessary to ensure the mango puree is completely smooth, showing “no ice crystals” in the final result. You will also need a stainless steel loaf pan or an insulated ice cream container, which helps conduct cold evenly during the freezing process.
Finally, for the presentation, a minimalist matte white ceramic bowl provides the perfect high-contrast backdrop for the vibrant orange scoop. This setup mimics the professional side-lighting and soft-focus kitchen aesthetic found in elite culinary photography.
Step-by-Step Evolution of the Mango Ice Cream
Phase 1: Concentrating the Mango Essence
Begin by thawing your frozen mango puree just enough so it can be blended into a thick, smooth paste. If you are starting with fresh fruit, puree it and then strain it through a fine-mesh sieve to remove any stringy fibers.
Reserve about 60ml (1/4 cup) of this thick puree in a separate small bowl; this will become the “small pool of thick, bright mango puree” drizzled at the base. This step ensures the mango ice cream has layers of flavor and a professional plated appearance.
Phase 2: Whipping the Cloud Base
In a large, chilled glass bowl, pour in your heavy cream and begin whipping on medium-high speed. Watch closely for the visual cues: the cream will transform from liquid to soft bubbles, and finally to stiff, standing peaks.
Be careful not to over-whip into butter; you are looking for a smooth, matte sheen that holds its shape. This aeration is what prevents your mango ice cream from becoming a solid block of ice, giving it that “velvety” scoopable nature.
Phase 3: The Gentle Fold
In a separate bowl, whisk together the remaining mango puree and the full can of sweetened condensed milk until perfectly homogenous. Add the pinch of sea salt and a drop of vanilla extract if you desire extra depth of flavor.
Slowly fold the mango mixture into the whipped cream using a large rubber spatula. Use a “cut and fold” motion to maintain the air bubbles you worked so hard to create; this is the key to the dense yet light mango ice cream texture.
Phase 4: The Deep Freeze
Transfer the mixture into your chilled container and smooth the top with an offset spatula. Cover the surface directly with plastic wrap to prevent any ice crystals from forming on the top layer during the 6-hour freeze.
While the mango ice cream sets, prepare your garnishes by cutting the fresh mango into precise 1cm (0.4 inch) cubes. Place these in a small airtight container in the fridge so they remain “glistening” and fresh for the final assembly.
Expert Tips for a Professional Finish
- The Tempering Secret: Before scooping, let the mango ice cream sit on the counter for 5-7 minutes. This allows the exterior to soften slightly, creating that “slight sheen” and perfect “scoop-drag marks” when the metal hits the cream.
- Fiber-Free Focus: If using fresh mangoes for the puree, always opt for Champagne or Ataulfo varieties. These have significantly less fiber, ensuring your mango ice cream is as smooth as silk.
- Chilled Bowls: Always chill your mixing bowl and beaters in the freezer for 15 minutes before whipping the cream. This ensures maximum volume and stability for the fats.
- Drizzle Technique: When plating, place the pool of puree in the bowl *before* the scoop. This creates the “base drizzle” effect seen in professional photography without making a mess of the scoop itself.
If you find yourself with leftover fresh mango, consider using it as a topping for a tropical dinner bowl or even incorporating it into a fresh fruit-forward salad.
Preserving Your Tropical Creation
Mango ice cream can be stored in the back of the freezer (the coldest part) for up to two weeks. To maintain the best quality, keep the plastic wrap pressed directly against the surface of the ice cream to block out air and prevent freezer burn.
If the ice cream becomes too hard after several days, simply allow it to temper at room temperature for a few extra minutes before serving. The high fat and sugar content from the condensed milk will help it regain its velvety texture quickly.
The Best Pairings for Mango Ice Cream
While this mango ice cream is a star on its own, it pairs beautifully with other vibrant dishes. Serve a scoop alongside a platter of refreshing fruit appetizers for a summer party.
For a more formal dessert course, consider placing a scoop next to a warm piece of almond cake or even serving it as a palate cleanser after a spicy meal like spicy Korean noodles or savory poultry dishes.
Frequently Asked Questions
You can substitute heavy cream with full-fat coconut cream and sweetened condensed milk with sweetened condensed coconut milk for a similar tropical result.
No, this is a no-churn recipe. The high fat content from the heavy cream and the sugar from the condensed milk prevent the mixture from freezing solid, keeping it scoopable without an expensive machine.
Press a piece of plastic wrap or wax paper directly onto the surface of the ice cream before freezing. This prevents air contact and moisture from crystallizing on the top layer.
Alphonso or Ataulfo (Champagne) mangoes are best because they are fiberless and have a deep golden-orange color, which provides the best texture and visual appeal.
Frozen mango puree helps keep the base temperature extremely low while mixing, which prevents the formation of large ice crystals and ensures a smoother, more velvety final texture.
The Ultimate Homemade Mango Ice Cream Recipe
Mango Ice Cream: The Ultimate No-Churn Velvety Tropical Dessert
Ingredients
Equipment
Method
- Blend the frozen mango puree until completely smooth. Reserve 1/4 cup (60ml) for the final plating drizzle.
- In a chilled bowl, whip the heavy cream until stiff peaks form and it has a matte, velvety sheen.
- Whisk the remaining mango puree with the sweetened condensed milk and salt. Gently fold this into the whipped cream until no white streaks remain.
- Pour the mixture into a metal pan, cover with plastic wrap touching the surface, and freeze for at least 6 hours until dense and scoopable.
- Temper for 5 minutes. Scoop into a matte white bowl, creating visible drag marks. Top with 4 mango cubes, a mint leaf, and a drizzle of the reserved puree.
Notes
Tempering the ice cream for 5 minutes is essential for the best texture.
Join the Culinary Journey
We hope this mango ice cream brings a burst of tropical sunshine to your kitchen. The combination of dense, velvety cream and the bright, golden-orange fruit is a testament to how simple ingredients can create a masterpiece.
If you enjoyed this recipe, please leave a comment below and share your results! You can find more visual inspiration and recipe tips by following us on Pinterest. Don’t forget to sign up for our newsletter for more elite recipes delivered straight to your inbox.