When you think of the ultimate easy seafood recipes, your mind likely drifts to succulent, jumbo shrimp bathed in a pool of glistening garlic butter. There is something undeniably alluring about the way a perfectly seared shrimp catches the light, its edges slightly charred and golden, while the center remains tender and snap-fresh. This recipe isn’t just about feeding yourself; it’s about a sensory experience that feels like a five-star bistro meal in the comfort of your own kitchen.
The beauty of working with jumbo shrimp is their efficiency. They cook in minutes, making them the crown jewel of easy seafood recipes for busy weeknights. However, the secret to that restaurant-quality finish lies in the technique: a high-heat sear in a cast iron skillet followed by a delicate emulsification of butter and citrus. This creates a sauce that clings to every crevice of the seafood rather than just sliding off into the pan.
In this guide, we will break down the culinary science behind the perfect sear, the “invisible” ingredients that make flavors pop, and how to achieve that stunning visual of toasted garlic bits and vibrant red chili flakes. Whether you are a novice or a seasoned home cook, this method will change how you approach quick seafood forever. Let’s dive into the details of making this glossy, aromatic masterpiece.
The Hallmarks of This Perfect Garlic Butter Skillet
- High-Contrast Textures: You get the snap of the jumbo shrimp skin, the crunch of toasted garlic, and the silkiness of an emulsified butter sauce.
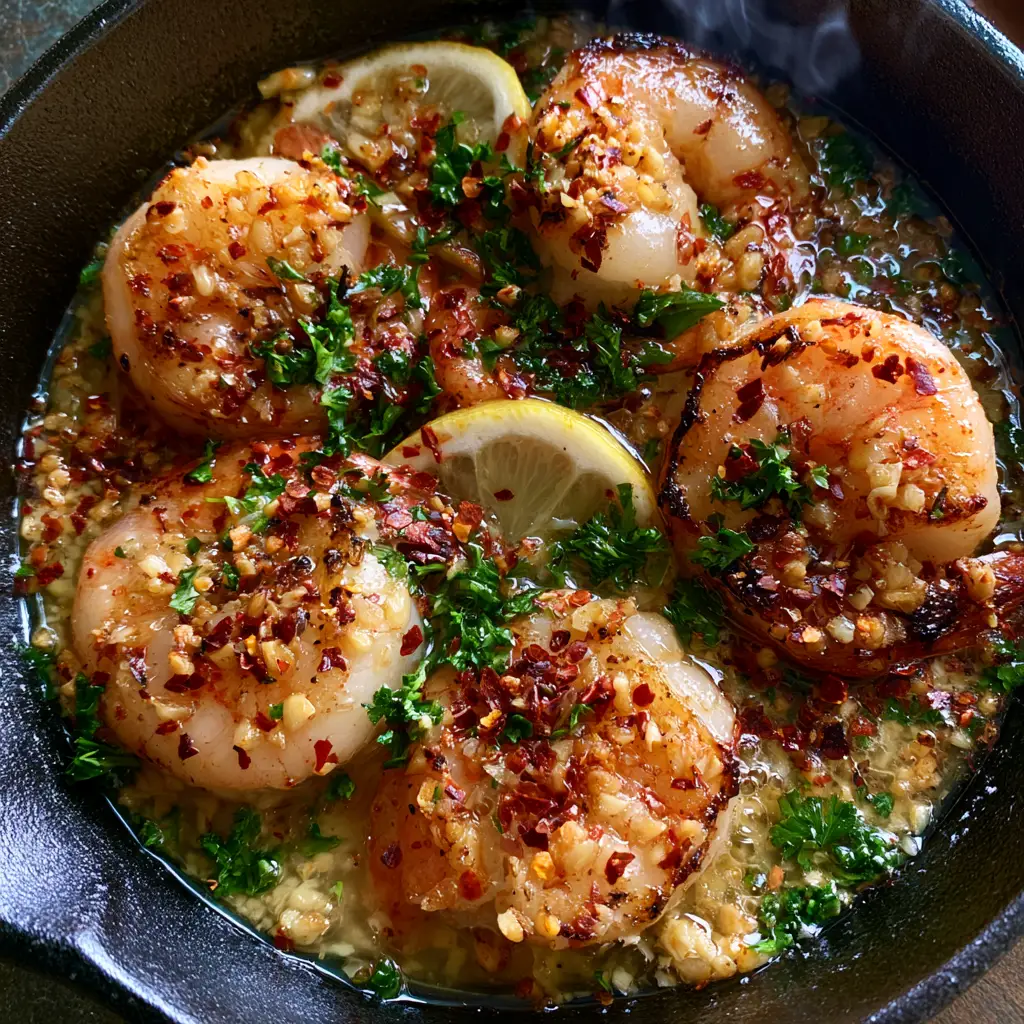
- Vibrant Visual Appeal: Bright green flat-leaf parsley and red chili flakes provide a color pop against the rustic matte black of the cast iron.
- Concentrated Flavor Profile: By searing the shrimp first, we build a “fond” (browned bits) in the pan that seasons the garlic butter sauce from the bottom up.
- Universal Versatility: This dish pairs effortlessly with everything from crusty sourdough to light, Mediterranean-style salads.
The Anatomy of Ingredients for Professional Results
To master easy seafood recipes, you must understand that every ingredient serves a dual purpose: flavor and visual texture. Here is what you will need for this specific skillet dish.
Jumbo Tail-On Shrimp (approx. 1 lb or 450g): Large shrimp are essential for that succulent “bite.” Keeping the tails on provides a handle for eating and adds a deep, savory depth to the butter sauce as it simmers.
Avocado or Grapeseed Oil (1 tbsp or 15ml): You need a high-smoke point oil for the initial sear. Butter would burn at the temperatures required to get those charred, golden edges shown in our visual blueprint.
Unsalted Butter (4 tbsp or 56g): Using unsalted butter allows you to control the seasoning precisely. We will emulsify this at the end to create that glossy, translucent pool that coats the shrimp.
Fresh Garlic (6 cloves, minced): We use a high volume of garlic here. Half will be toasted to a golden brown for crunch, while the other half melts into the sauce for a pungent, sweet aroma.
Dried Red Chili Flakes (1 tsp or 2g): These provide a gentle heat and “vibrant flakes” of color that stand out against the golden-pink shrimp.
Fresh Flat-Leaf Parsley (1/4 cup or 15g, chopped): Never use dried parsley here. The fresh herb adds a necessary “bright green” scatter that cuts through the richness of the fats.
Lemon (1 large): We will use half for juice to deglaze the pan and the other half cut into thin semi-circles to tuck between the shrimp for a juicy, acidic finish.
Kosher Salt and Cracked Black Pepper (to taste): These “invisible” essentials are what actually bridge the gap between “bland” and “restaurant-quality.”
Essential Equipment for a Perfect Sear
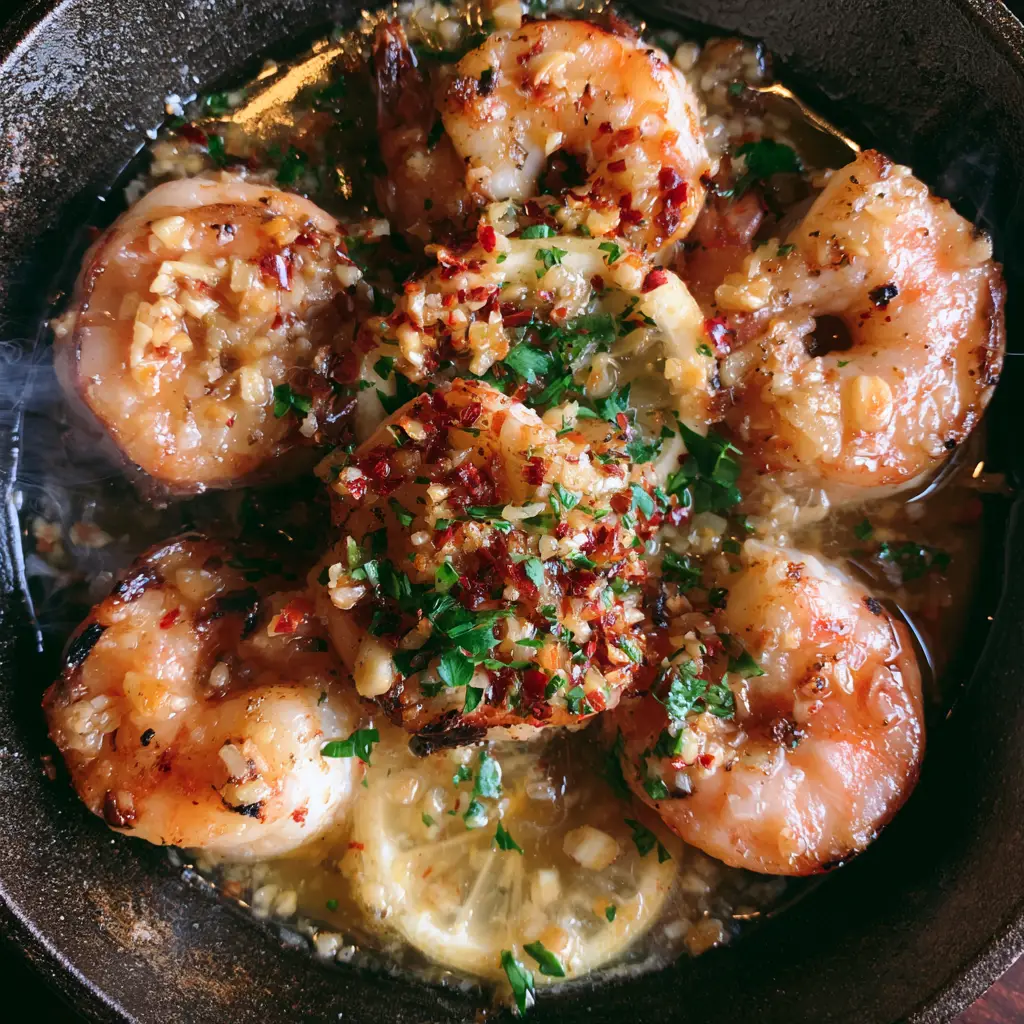
Achieving the visual descriptors in our Midjourney prompt—specifically the charred edges and glistening sauce—requires the right tools. A rustic, matte black cast iron skillet is the non-negotiable hero of this recipe. Cast iron retains heat better than any other surface, ensuring that when the cold shrimp hit the pan, the temperature doesn’t drop.
You will also need a high-quality stainless steel spatula or tongs to flip the shrimp individually. To achieve the “finely minced” garlic bits, a sharp chef’s knife or a microplane is preferred over a garlic press, which can make the garlic too paste-like, preventing it from toasting into distinct, crispy bits.
Step-by-Step: Engineering the Golden Garlic Shrimp
1. Preparing the Seafood for Heat
Pat the jumbo shrimp completely dry with paper towels. This is the most important step for easy seafood recipes; moisture is the enemy of a golden sear. If the shrimp are wet, they will steam rather than char. Season them generously with kosher salt and cracked black pepper just before they hit the heat.
2. The High-Heat Sear
Place your cast iron skillet over medium-high heat until the oil begins to shimmer and a wisp of smoke appears. Add the shrimp in a single layer, ensuring they do not overlap. Let them sit undisturbed for 2 minutes. You are looking for the “visual cue” of a deep golden-pink color and visible charred edges on the underside before flipping.
3. Toasting the Garlic Aromatics
Once the shrimp are flipped, push them to the outer edges of the skillet. Add the butter to the center. As it melts and begins to foam, add the minced garlic and red chili flakes. Watch for the sensory cue: the garlic should turn a pale straw color and smell toasted, but not dark brown, which would indicate bitterness.
4. Emulsifying the Glossy Sauce
Squeeze the juice of half a lemon into the bubbling butter. Use your spatula to scrape up the browned bits from the bottom of the black skillet. Toss the shrimp back into the center, coating them in the glossy, translucent butter. The steam rising from the pan at this moment carries the intense aroma of toasted garlic and citrus.
5. The Final Garnish
Turn off the heat. The residual heat of the cast iron will keep the dish sizzling. Scatter the fresh chopped flat-leaf parsley generously over the top. Tuck the thin lemon semi-circles between the succulent shrimp. The contrast of the yellow citrus against the matte black skillet creates that professional, top-down flat lay look.
Expert Tips for Success
- Don’t Overcrowd the Pan: If you are doubling the recipe, cook the shrimp in two batches. Overcrowding drops the temperature, leading to rubbery, grey shrimp instead of golden-pink ones.
- Cold Butter for Emulsion: If your sauce looks oily, whisk in a small knob of cold butter at the very end. The cold fat helps stabilize the sauce into a creamy, glossy coating.
- The “Snap” Test: Shrimp are done when they form a “C” shape. If they tightly curl into an “O,” they are overcooked and will be tough.
- Garlic Timing: Never add garlic at the start of a sear. It takes 30 seconds to burn and 2 minutes to toast. Add it only once the shrimp are nearly finished.
Storage, Reheating, and Make-Ahead Advice
Seafood is best enjoyed immediately, but if you have leftovers, they can be stored in an airtight container for up to 2 days. To reheat, avoid the microwave, which turns shrimp into rubber. Instead, place them back in a skillet over low heat with a splash of water or extra butter until just warmed through.
For a make-ahead option, you can mince the garlic and chop the parsley up to 24 hours in advance. However, do not season the shrimp until the moment you are ready to cook, as salt can draw out moisture and ruin the sear.
What to Serve With This Buttery Seafood Masterpiece
To keep with the theme of easy seafood recipes, pair this dish with sides that soak up that incredible garlic butter sauce. A side of caramelized onion pasta provides a sweet, jammy contrast to the spicy chili flakes. Alternatively, if you want to keep the meal light and vibrant, a crisp greek salad offers a refreshing crunch that balances the richness of the butter.
For those looking for a fusion experience, serving these shrimp over a coconut chicken rice bowl base (omitting the chicken) adds a tropical creaminess that complements the lime-like acidity of the lemon. And if you’re hosting a themed dinner, these shrimp fit perfectly alongside other turkish recipes or Mediterranean mezze platters.
Common Questions About Searing Jumbo Shrimp
Yes, but they must be completely thawed and patted dry with paper towels. Any excess moisture will prevent the shrimp from getting those signature charred edges.
While not required, leaving the tails on adds flavor to the butter sauce and provides a better visual presentation. It also helps the shrimp stay succulent during the sear.
This is called emulsification. By adding lemon juice and stirring the butter rapidly as it melts, you combine the fats and liquids into a smooth, translucent sauce.
A cast iron skillet is highly recommended for easy seafood recipes because it maintains the high temperature needed to char the shrimp without overcooking the centers.
Garlic burns quickly at high heat. To prevent this, only add the minced garlic after the shrimp have been seared and flipped, and reduce the heat slightly if needed.
The Full Recipe: Golden Garlic Butter Shrimp
Easy Seafood Recipes: 10-Minute Golden Garlic Butter Shrimp
Ingredients
Equipment
Method
- Pat the jumbo shrimp dry with paper towels to ensure a perfect sear. Season with salt and pepper.
- Heat oil in a cast iron skillet over medium-high heat until it shimmers.
- Add shrimp in a single layer. Sear for 2 minutes until charred edges appear, then flip.
- Add butter, garlic, and chili flakes. Stir for 1 minute until garlic is toasted and fragrant.
- Stir in lemon juice and parsley. Toss to coat shrimp in the glossy, emulsified butter.
Notes
Use fresh lemon for the best acidity and to cut through the butter sauce.
Closing & Call to Action
This golden garlic butter shrimp is a testament to why easy seafood recipes are a staple in every professional chef’s home rotation. It’s fast, incredibly flavorful, and visually stunning enough for a formal dinner party. The combination of the charred cast iron sear and the emulsified citrus butter is a technique you’ll find yourself using for everything from scallops to salmon.
If you enjoyed this recipe, please leave a comment below and tell us how yours turned out! Did you achieve those perfect charred edges? Don’t forget to share your creations on Pinterest and tag amber_bakes so we can see your beautiful skillet flat lays. Happy cooking!