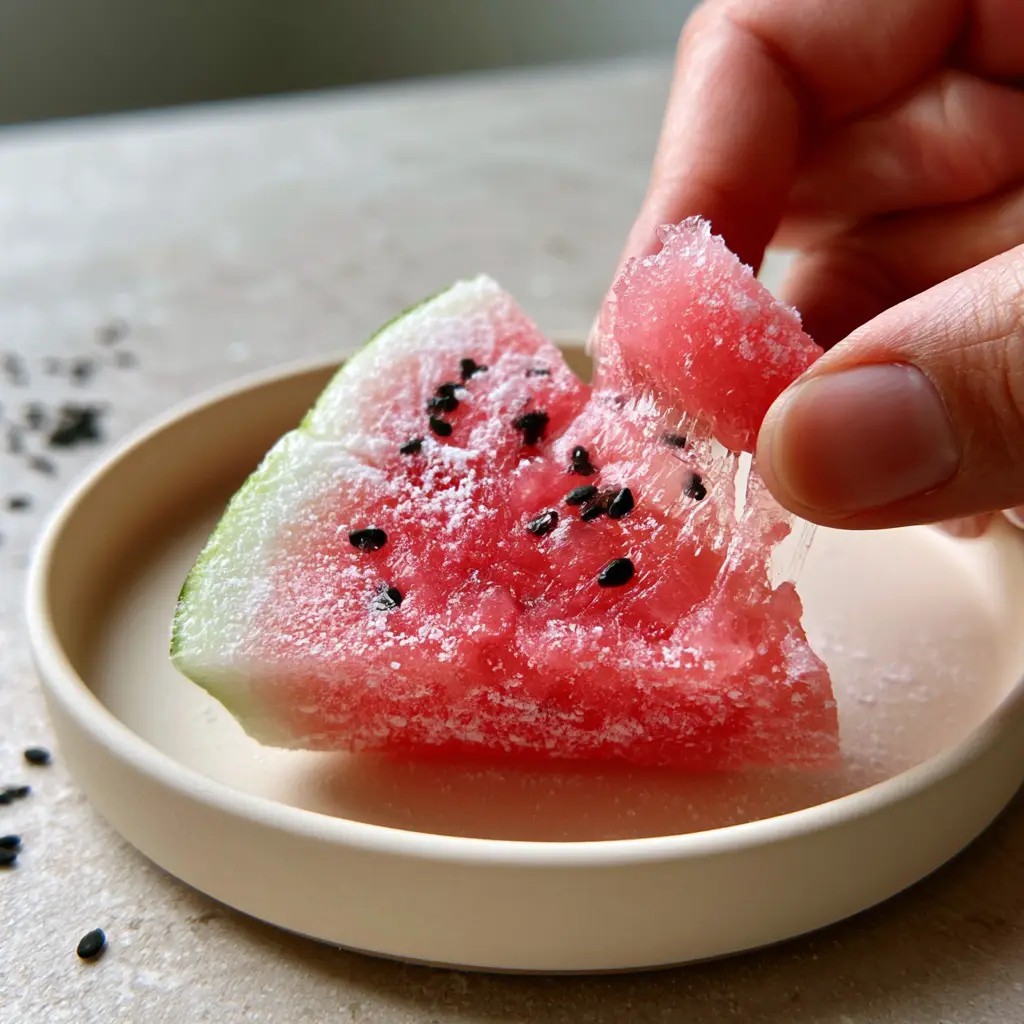
There is nothing quite as satisfying as the tactile pull of a fresh, homemade watermelon mochi. This Japanese-inspired treat captures the essence of summer, blending the iconic look of a miniature watermelon slice with the addictive, “QQ” bouncy texture of traditional wagashi.
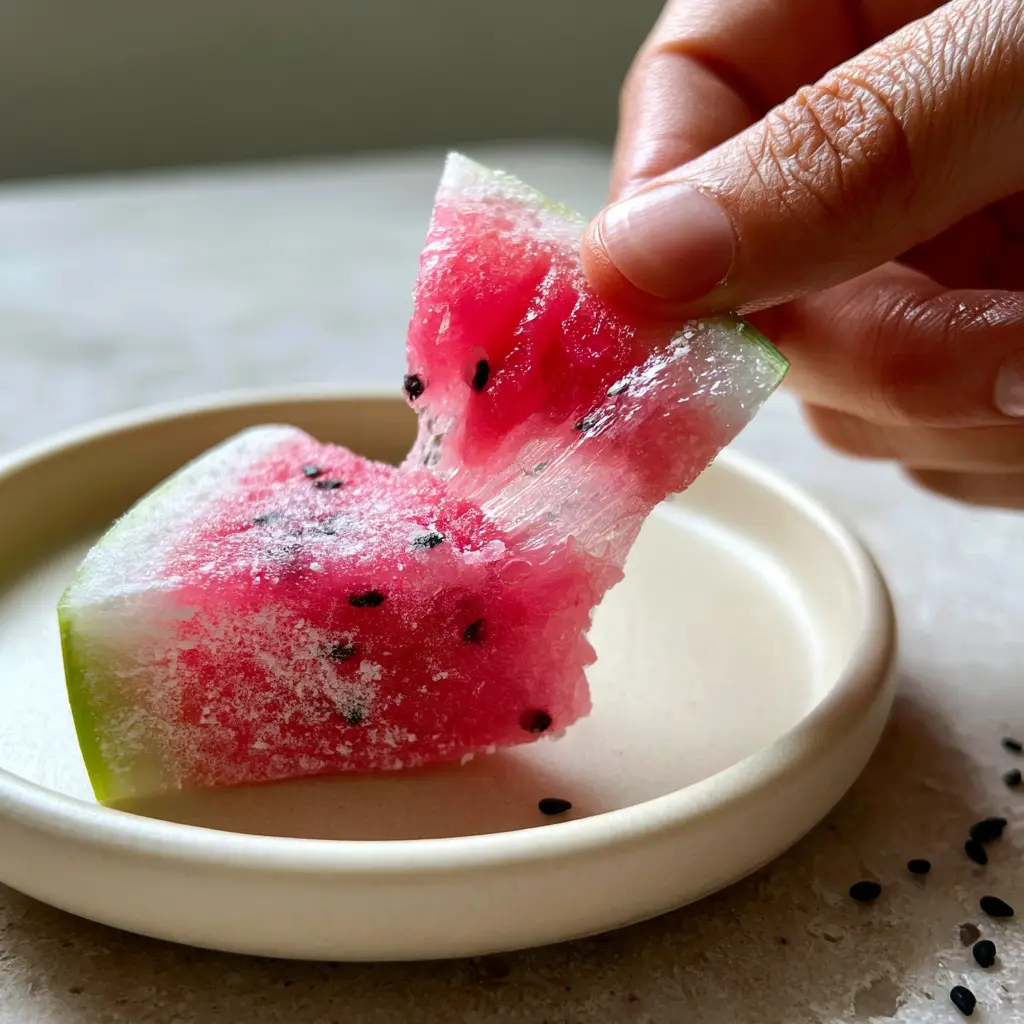
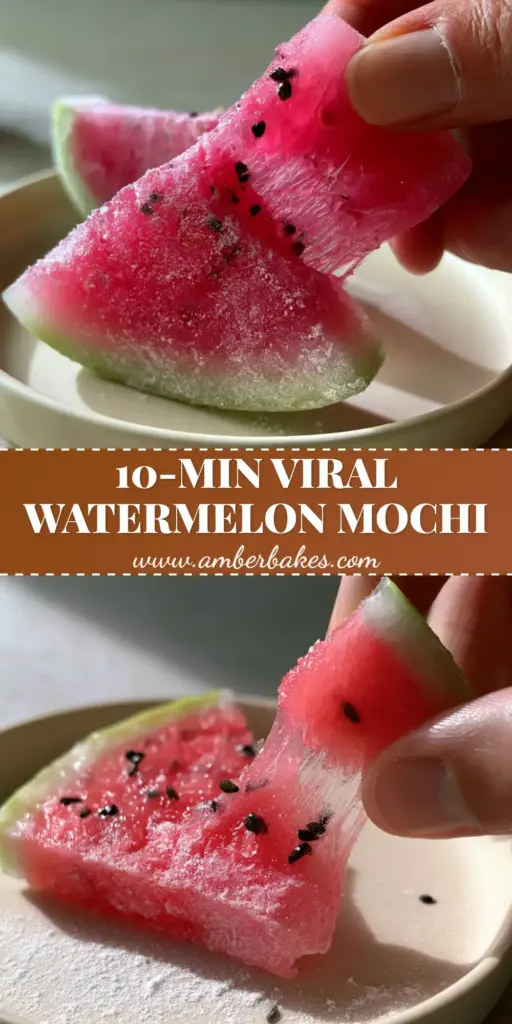
When you pull a piece apart, you are greeted by a vibrant pink center that is both translucent and remarkably elastic. The contrast between the soft, matte dusting of white starch and the thin, matcha-green rind makes these little morsels a visual masterpiece on any dessert platter.
In this guide, we are going to dive deep into the culinary science of glutinous rice flour. We will master the art of the “stretch” and ensure your watermelon mochi looks exactly like the artisanal treats found in a high-end Tokyo confectionery.
The Ultimate Sensory Experience of Homemade Watermelon Mochi
Crafting these treats is as much about the process as it is about the final bite. Here is what you can expect from this specific recipe, meticulously designed to match the visual perfection of professional rice cakes:
- The Perfect Snap: A translucent, elastic center that offers a signature “QQ” bite—not too mushy, not too firm.
- Visual Realism: A dual-layered mochi structure featuring a vibrant pink interior and a delicate matcha-green outer rind.
- Textural Contrast: Toasted black sesame seeds embedded in the dough to mimic watermelon seeds, providing a subtle, nutty crunch.
- Matte Finish: A fine, velvet-like coating of potato starch that prevents sticking while adding a professional, soft-focus aesthetic.
- Natural Flavoring: The use of real watermelon reduction and premium matcha for an authentic, refreshing taste profile.
If you enjoy exploring unique fruit-based treats, you might also want to check out some fascinating watermelon facts to impress your guests while they snack. The chemistry of watermelon is actually quite helpful when learning how to incorporate its juice into stable doughs.
Essential Elements for the Perfect Pink Center and Matcha Rind
Every ingredient in this watermelon mochi recipe serves a structural or visual purpose. To achieve that professional translucency, we must choose our flour and sugars with forensic precision.
Glutinous Rice Flour (Mochiko): 1 ½ cups (200g). This is the backbone of our mochi; it contains high levels of amylopectin, which creates the iconic stretchy and sticky texture when steamed. Do not substitute with regular rice flour, or you will lose the elasticity.
Granulated Sugar: ½ cup (100g). Sugar acts as a softener and preservative in mochi. It prevents the rice starches from “retrograding” or hardening too quickly, keeping your treats soft for days.
Watermelon Juice (Reduced): ¾ cup (180ml). We use a concentrated watermelon reduction to provide the vibrant pink color and a subtle fruity aroma without adding too much liquid. This ensures the dough remains workable and elastic.
Matcha Powder: 1 tsp (2g). A small amount of high-quality matcha provides the natural, pale green hue for the “rind.” It offers a slight earthy bitterness that balances the sweetness of the pink center.
Toasted Black Sesame Seeds: 1 tbsp (9g). These represent the watermelon seeds. We toast them briefly to release their oils, ensuring they provide a fragrant pop of flavor against the sweet dough.
Potato Starch (Katakuriko): ½ cup (65g). Used exclusively for dusting, this fine starch is essential for handling the sticky dough. It creates that beautiful matte finish seen in professional photography.
Coconut Oil or Neutral Oil: 1 tsp (5ml). A tiny amount of fat added to the dough helps achieve that translucent, glossy look within the elastic center. It also improves the “mouthfeel” of the mochi.
Red Food Coloring: 1-2 drops (Optional). While the watermelon juice provides color, a tiny drop of gel coloring ensures the “vibrant pink” visual requirement is met perfectly.
Professional Tools for Crafting Artisanal Rice Cakes
To achieve the “QQ” texture and the precise layering of the watermelon mochi, you will need a few specific kitchen tools. The steaming method is the most traditional way to ensure a translucent finish.
A bamboo or metal steamer is preferred for this recipe. Steaming allows the heat to penetrate the dough evenly, gelatinizing the starches without drying out the surface. If you don’t have one, a microwave-safe glass bowl and high-quality plastic wrap can work for a modern shortcut.
You will also need a silicone spatula, which is indispensable for working with the incredibly sticky hot dough. A sharp, non-stick knife or a piece of unflavored dental floss is best for slicing the final mochi roll into perfect “watermelon” rounds without squishing the delicate layers.
Step-by-Step Guide to Achieving That Signature Stretchy Snap
Follow these steps carefully to ensure your watermelon mochi has the exact translucency and “hand-pulled” elasticity described in our visual blueprint.
Step 1: Preparing the Watermelon Essence
Start by blending fresh watermelon and straining it to get clear juice. Simmer the juice in a small saucepan over medium heat until it reduces by half. This concentrates the flavor and the pink pigments, ensuring the dough isn’t watered down.
Step 2: Mixing the Pink Base Dough
In a medium bowl, whisk together the glutinous rice flour and sugar. Slowly pour in the reduced watermelon juice and the optional drop of red food coloring. Stir with a silicone spatula until a smooth, thick paste forms with no visible lumps of dry flour.
Step 3: The Steaming Process for QQ Texture
Place the bowl in your steamer over boiling water. Cover and steam for 15-20 minutes. You will know it is done when the dough changes from opaque white-pink to a deeper, translucent vibrant pink. The dough should look shiny and feel extremely elastic when poked.
Step 4: Incorporating the “Seeds”
Once steamed, remove the dough and let it cool slightly until it is handleable but still very warm. Fold in the toasted black sesame seeds. You want them distributed unevenly to mimic the natural look of a real watermelon.
Step 5: Crafting the Matcha Rind
In a separate smaller bowl, mix a small portion of the base mochi dough (about 1/4 of the total) with the matcha powder. Knead it gently on a surface dusted with potato starch until the green color is uniform. This will be your “rind.”
Step 6: Assembly and Layering
Shape the pink dough into a long cylinder or “log.” Roll out the green matcha dough into a thin rectangular sheet. Wrap the green sheet tightly around the pink log, sealing the seam with a tiny bit of moisture if needed.
Step 7: The Final Dusting and Slicing
Roll the entire assembly in a generous amount of potato starch until the surface is matte and no longer sticky. Using a sharp knife, slice the log into rounds, then slice those rounds in half to create the “mini watermelon slice” shape. Use a pastry brush to remove any excess starch from the pink faces to reveal the vibrant color.
Master Techniques for Handling Sticky Glutinous Rice Dough
Working with watermelon mochi can be intimidating because of the stickiness. However, with these professional tips, you can maintain control over the dough.
- Temperature Control: Always handle the dough while it is warm. As mochi cools, it becomes less pliable and harder to shape. If it gets too cold, a 10-second zap in the microwave can restore its elasticity.
- Starch Management: Be generous with the potato starch on your hands and work surface, but sparing on the dough itself. You want a “matte dusting,” not a thick crust of flour.
- Avoid Water on Finished Mochi: Water is the enemy of the finished texture. It will turn the starch into a gummy paste. Use only dry tools for the final assembly.
- The Elasticity Test: Before you stop steaming, pull a small piece of dough. It should stretch at least 3-4 inches without breaking. If it snaps quickly, it needs more steaming time.
If you find yourself with extra watermelon after making this, consider trying these watermelon fries for another creative way to use this summer fruit. They are a great textural contrast to the soft chew of mochi.
Preserving the Freshness and Elasticity of Your Mochi
Fresh watermelon mochi is best enjoyed within 24 hours of making it. Because this recipe uses real fruit juice and sugar, the texture is at its peak when the starches are still fully hydrated and soft.
Store your mochi in an airtight container at room temperature. Do not refrigerate them, as the cold temperature causes the rice starch to crystallize, turning your stretchy treat into a hard, rubbery puck. If you must keep them longer, you can wrap them individually in plastic wrap and freeze them for up to two weeks. Thaw at room temperature for 30 minutes before serving.
Creative Summer Pairings and Refreshing Drinks
This watermelon mochi is a star on its own, but it pairs beautifully with other summer-inspired recipes. Since the flavor profile is light and floral, it works well with creamy or tart accompaniments.
Try serving these alongside a scoop of mango ice cream for a tropical dessert platter. The creaminess of the mango balances the “QQ” chew of the rice cake perfectly. If you are preparing a spread for a special occasion, these mochi also fit wonderfully into Ramadan recipes as a sweet, energy-dense treat to break the fast.
For a beverage pairing, a cold glass of green tea or a light sparkling hibiscus tea will highlight the matcha notes in the rind and the subtle sweetness of the watermelon center.
Common Questions About Making Fruit-Inspired Wagashi
No, regular rice flour (made from long-grain rice) does not have the amylopectin required for stickiness and stretch. You must use glutinous rice flour, specifically labels like Mochiko or Shiratamako.
By using a reduced watermelon juice concentrate, this recipe provides a subtle, natural watermelon flavor. For a more intense taste, a drop of food-grade watermelon extract can be added.
The ‘QQ’ texture is achieved through the correct ratio of sugar to flour and the steaming process. Sugar helps the dough remain soft and bouncy, while steaming ensures a smooth, elastic consistency.
Mochi hardens due to starch retrogradation, which is accelerated by cold temperatures. Never store mochi in the fridge. Keep it at room temperature in an airtight container to maintain softness.
If your mochi lacks stretch, it was likely under-steamed. The starches in the glutinous rice flour need heat and moisture to fully gelatinize and create that elastic bond. Steam until the dough looks translucent.
The Ultimate Watermelon Mochi Recipe Card
Watermelon Mochi: How to Make Stretchy, Translucent QQ Rice Cakes
Ingredients
Equipment
Method
- Whisk glutinous rice flour, sugar, and reduced watermelon juice until a smooth paste forms.
- Steam the mixture for 15-20 minutes until it becomes translucent, vibrant pink, and extremely elastic.
- Knead matcha powder into a small portion of the warm dough to create the green rind.
- Fold sesame seeds into the pink dough, shape into a log, and wrap with the thin green matcha layer. Slice into half-moons.
Notes
Store at room temperature in an airtight container; do not refrigerate.
Share Your Stretchy Mochi Creations!
Mastering the watermelon mochi is a true badge of honor for any home baker. The combination of the vibrant pink elastic center and the earthy matcha rind is a testament to your culinary skill and attention to detail. Whether you’re making these for a summer party or a quiet afternoon treat, they are sure to spark joy.
We would love to see your results! Please leave a comment below and tell us how your “QQ” texture turned out. Did you achieve that perfect hand-pulled stretch? Don’t forget to follow us on Pinterest for more visually stunning recipes and baking inspiration.