There is a specific culinary magic that happens when high-heat searing meets the bright, acidic punch of citrus and the deep, floral sweetness of honey. This Honey Lime Chicken isn’t just another weeknight dinner; it is a visual and sensory experience designed to replicate the glistening, charred perfection of high-end bistro cooking right in your own kitchen.
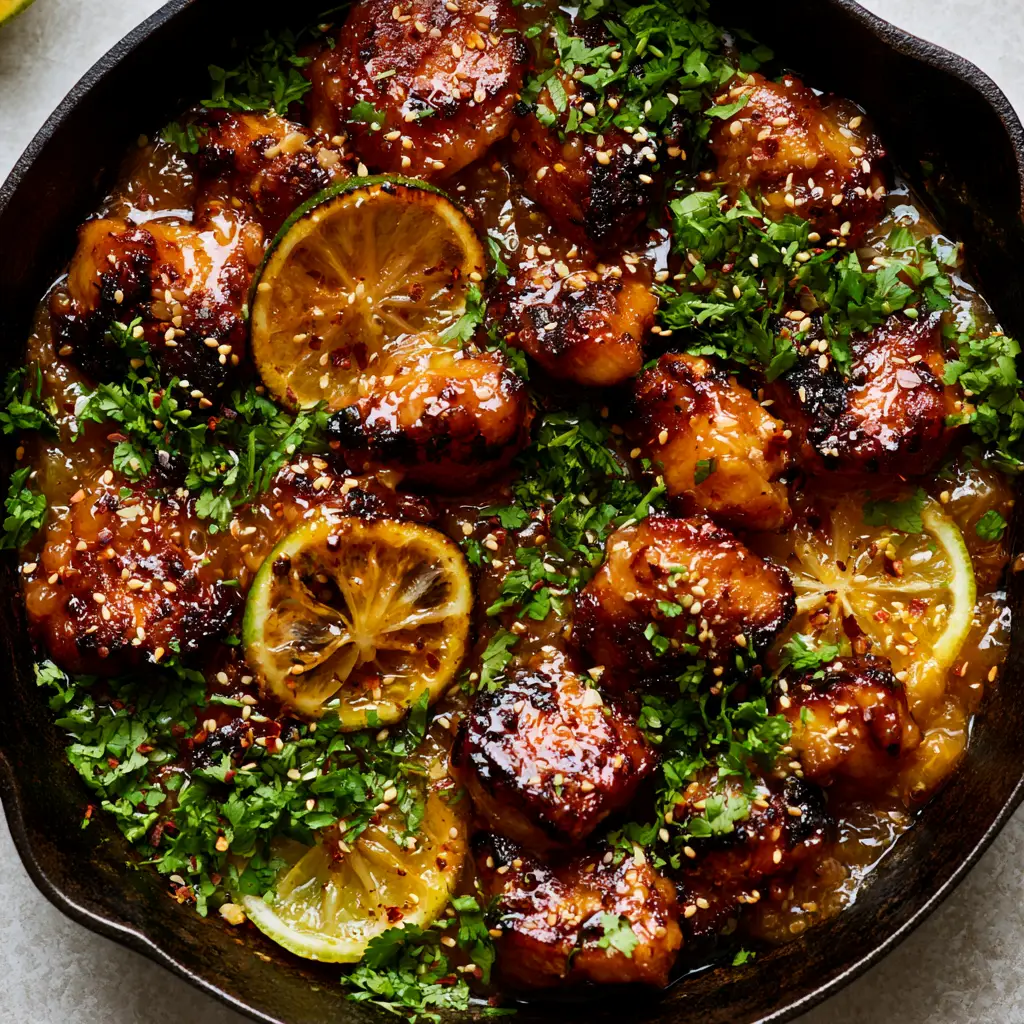
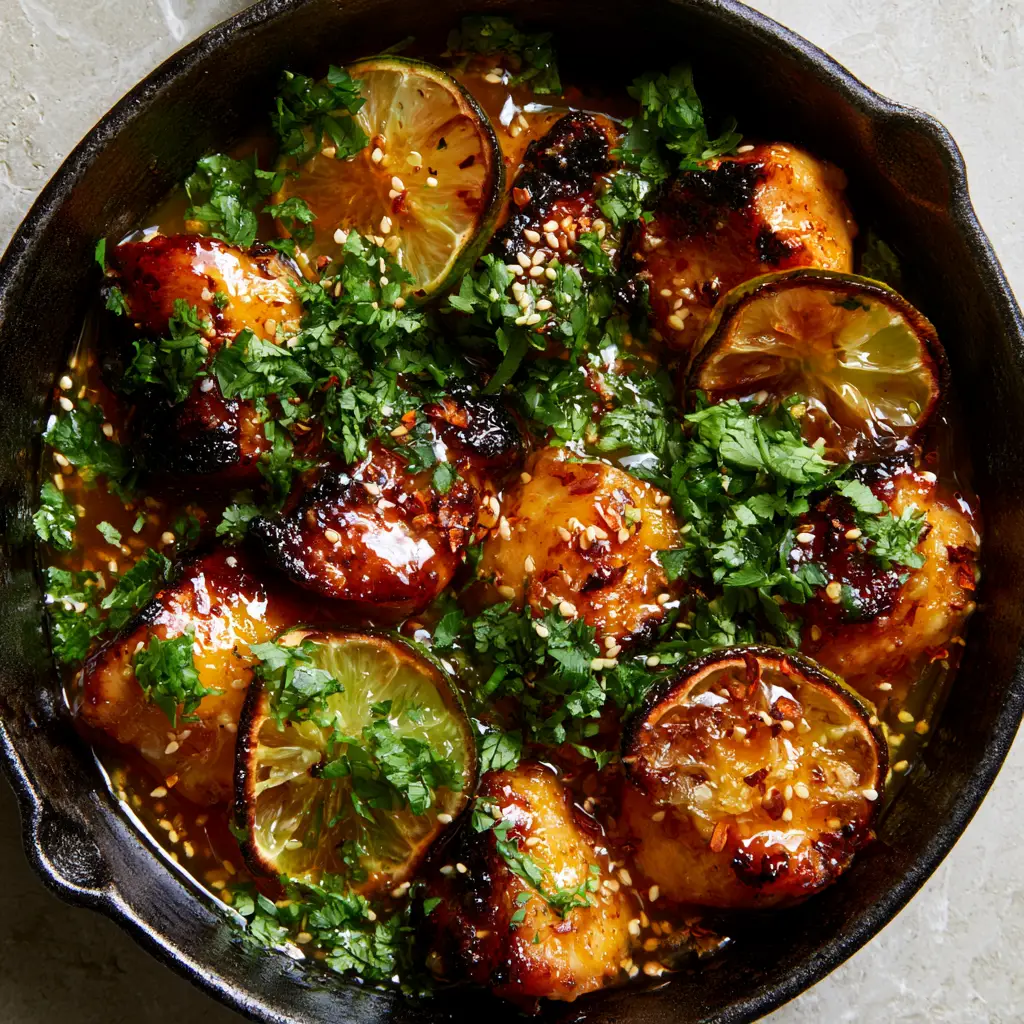
Imagine succulent chunks of chicken thighs, seared until their edges are dark and crispy, then enveloped in a thick, translucent amber glaze that catches the light like liquid gold. The addition of softened lime wheels, caramelized directly in the pan juices, adds a sophisticated bitterness that balances the sweetness perfectly.
Whether you are looking for a show-stopping centerpiece for a weekend gathering or a quick 30-minute meal that tastes like it took hours, this recipe delivers. We are utilizing the unique heat retention of a cast iron skillet to ensure every single bite has that hallmark “charred” texture described in our visual blueprint.
Why This Sticky Citrus Chicken Recipe Works
- The Maillard Reaction: By using boneless chicken thighs and high-smoke-point oil, we achieve a deep, savory crust that provides a structural contrast to the sticky sauce.
- Glossy Glaze Chemistry: The combination of honey and fresh lime juice, reduced at a specific temperature, creates a translucent, light-reflecting coating that clings to the meat without becoming gummy.
- Caramelized Aromatics: We don’t just garnish with lime; we cook thin slices until the rinds soften and the sugars intensify, integrating them into the very DNA of the dish.
- Visual Texture: The contrast between the bright green cilantro, the ivory toasted sesame seeds, and the vibrant red chili flakes makes this dish a literal work of art.
Essential Pantry Staples for the Glossiest Glaze
To achieve the specific “translucent amber” look of this Honey Lime Chicken, the quality and type of your ingredients matter. We aren’t just tossing things in a pan; we are building layers of flavor and visual appeal.
1.5 lbs (680g) Boneless Skinless Chicken Thighs: Thighs are essential here because they contain enough fat to withstand high-heat searing without drying out, resulting in those prized charred edges. Chop them into uniform 1-inch (2.5cm) bite-sized pieces for maximum surface area.
1/2 cup (120ml) High-Quality Honey: This is the primary sweetener and the source of our glossy sheen. Use a clover or wildflower honey for a neutral but rich flavor profile that won’t overpower the lime.
1/4 cup (60ml) Fresh Lime Juice: Fresh is non-negotiable here. The bottled stuff lacks the enzymatic brightness needed to cut through the heavy honey and chicken fat.
2 tbsp (30ml) Soy Sauce: This provides the “amber” depth of color and a necessary hit of umami to ground the sweetness. If you enjoy this profile, you might also love the savory-sweet balance of my General Tso’s chicken recipe.
1 tbsp (15ml) Avocado Oil: You need an oil with a high smoke point to achieve that deep sear in the cast iron skillet without filling your kitchen with smoke.
1 tsp (2g) Crushed Red Pepper Flakes: These provide “tiny red sparks” of heat that cut through the sugar. Adjust based on your heat tolerance.
1 tbsp (9g) Toasted White Sesame Seeds: These add a nutty crunch and a professional, “scattered” visual finish that makes the dish pop against the black skillet.
1/4 cup (15g) Fresh Cilantro: Finely chopped, this provides the “bright green” contrast necessary for a balanced flavor and photo-ready presentation.
The Culinary Logic of the Cast Iron Skillet
If you want the Honey Lime Chicken to look exactly like a high-end smartphone photograph, you must use a seasoned black cast iron skillet. Cast iron is a poor conductor but an incredible radiator of heat.
Once it gets hot, it stays hot. When you drop room-temperature chicken into a thin stainless steel pan, the temperature drops instantly, leading to steaming rather than searing. In cast iron, the heat remains constant, allowing the proteins to undergo the Maillard reaction rapidly.
This creates the “deeply seared with crispy charred edges” look. Furthermore, the dark patina of the skillet provides the perfect neutral backdrop for the vibrant oranges, greens, and reds of the finished dish. If you are a fan of one-pan meals, check out this chicken and zucchini stir fry for another quick cast iron option.
Step-by-Step Mastery: Achieving the Perfect Char
Preparing the Chicken for Maximum Surface Area
Start by patting your chicken pieces completely dry with paper towels. Moisture is the enemy of a good sear. If the chicken is wet, it will boil in its own juices rather than developing a crust.
Season the chicken pieces with 1 tsp (6g) kosher salt and 1/2 tsp (1g) black pepper. For an extra crispy edge, lightly toss the chicken in 1 tbsp (8g) of cornstarch. This foundational “invisible” ingredient is the secret to that thick, glossy sauce clinging perfectly to every bite.
The Art of the High-Heat Sear
Place your cast iron skillet over medium-high heat. Add the avocado oil and wait until it begins to shimmer and just barely wisps with smoke. This is your sensory cue that the pan is ready.
Add the chicken chunks in a single layer. Do not crowd the pan; if necessary, work in two batches. Let the chicken sit undisturbed for 3-4 minutes. You should hear a vigorous sizzling sound.
Flip a piece; if it releases easily and shows a deep, golden-brown crust, flip them all. Sear the other side for another 3 minutes until the edges look slightly charred.
Caramelizing the Lime Wheels
Push the chicken to the outer edges of the skillet. Place 4-5 very thin lime slices (wheels) directly onto the center of the hot surface. Let them sear for 1 minute per side until the rinds soften and turn a deep, translucent gold.
These lime wheels are more than a garnish; they infuse the oil with citrus oils and provide a beautiful, integrated look to the dish. Their “caramelized rinds” are a hallmark of professional culinary styling.
Building the Translucent Amber Glaze
In a small bowl, whisk together the honey, lime juice, soy sauce, and 2 cloves (10g) of minced garlic. Pour this mixture directly over the chicken and lime wheels in the skillet.
The sauce will immediately begin to bubble and foam. This is the water evaporating and the sugars in the honey beginning to concentrate. Stir constantly for 2-3 minutes.
Watch for the “Visual Cue”: The sauce will transition from a thin liquid to a thick, translucent, glossy amber glaze. It should coat the back of a spoon and reflect the light from your kitchen window.
Expert Tips for Visual and Flavor Success
- Don’t Overcrowd: If you put too much chicken in the pan at once, the temperature will drop, and you won’t get those charred edges.
- Freshness is Key: Use fresh lime zest in the glaze for an even deeper citrus aroma that hits the nose before the first bite.
- Control the Heat: If the honey starts to smell like it’s burning (bitter, acrid smell), immediately reduce the heat to low and add a splash of water or chicken broth.
- The Garnish Scatter: For the most professional look, scatter the cilantro and sesame seeds from a height of about 12 inches (30cm) to ensure an even, “precise scatter” as described in our prompt.
The Best Pairings for Honey Lime Chicken
This dish is bold and punchy, so it pairs best with neutral bases that can soak up that incredible amber glaze. A simple bowl of jasmine rice is the classic choice, but you could also serve this alongside a coconut chicken rice bowl for a tropical twist.
For a lighter option, try a crisp green salad with a light vinaigrette. If you’re looking for more global chicken inspiration, my Peruvian chicken or Persian chicken (coming soon) recipes offer equally vibrant flavor profiles that satisfy the “enthusiastic home cook” palate.
If you have leftover chicken, it works beautifully cold the next day on top of an Asian chicken crunch salad.
Frequently Asked Questions
While best served fresh for the crispy edges, it reheats well. Store in an airtight container for up to 3 days and reheat in a skillet to revive the glaze’s shine.
Yes, but be careful not to overcook them. Thighs are preferred for Honey Lime Chicken because they stay juicy at the high heats required to get those charred edges.
Honey has a low burn point. If the sauce smells bitter or looks too dark, immediately turn down the heat and add a tablespoon of water to stop the caramelization process.
The translucency comes from the emulsion of honey, lime juice, and a small amount of fat. Avoiding flour-based thickeners and using high-quality honey ensures that clear, reflective finish.
The glaze thickens as water evaporates and sugars concentrate. If it’s too thin, increase the heat slightly and simmer for another 1-2 minutes. A tiny bit of cornstarch on the chicken also helps.
The Complete Recipe: Sticky Honey Lime Chicken Bites
Honey Lime Chicken: The Ultimate Sticky, Seared Cast Iron Masterpiece
Ingredients
Equipment
Method
- Pat the chicken pieces dry with paper towels. Season with salt and pepper.
- Heat avocado oil in a cast iron skillet over medium-high heat. Add chicken in a single layer and sear for 3-4 minutes per side until deeply browned with charred edges.
- Push chicken to the side and place lime wheels in the center. Cook for 1 minute per side until softened and caramelized.
- Whisk honey, lime juice, soy sauce, and garlic. Pour into the skillet. Simmer for 2-3 minutes until the sauce is thick, translucent, and glossy.
- Remove from heat and scatter with cilantro, sesame seeds, and red pepper flakes.
Notes
Use fresh lime juice only; bottled juice will result in a flat flavor.
Closing & Call to Action
This Honey Lime Chicken is a testament to how simple ingredients, when treated with the right culinary techniques, can produce a restaurant-quality result. The combination of the heavy cast iron skillet and the precise honey-to-lime ratio ensures a dish that is as visually stunning as it is delicious.
If you enjoyed this recipe, please leave a comment below and let me know how your sear turned out! Don’t forget to follow me on Pinterest for more visually inspired recipes and kitchen tips. Sharing this post helps me continue to create high-quality, free content for home cooks like you!