There is nothing quite like the sensory explosion of a perfectly ripe fresh mango. When you find that ideal specimen—heavy in the hand with a skin showcasing a stunning gradient of tropical red and deep green—you know you are in for a treat. The aroma alone, a heady mix of floral nectar and sunshine, is enough to transport you to a white-sand beach. But for many home cooks, the intimidating pit and the slippery skin make preparing this “King of Fruits” a daunting task.
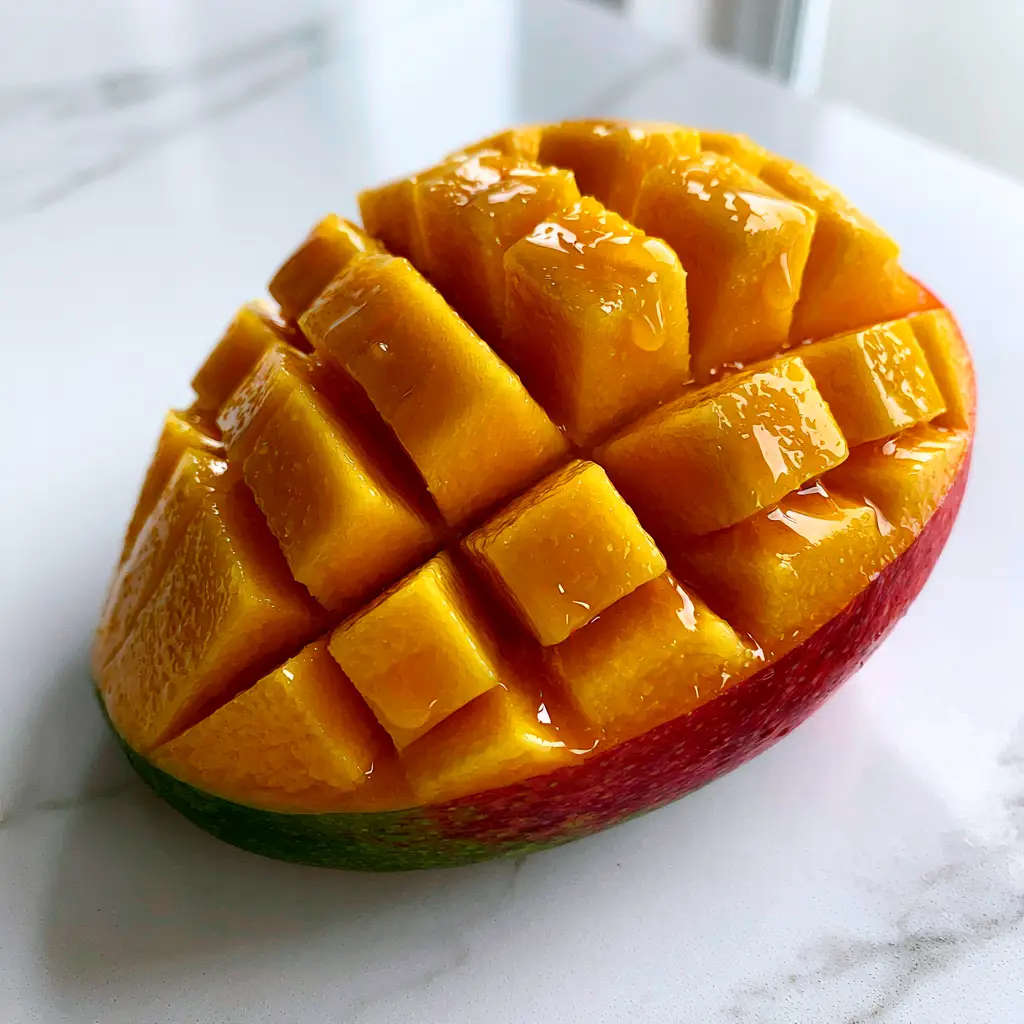
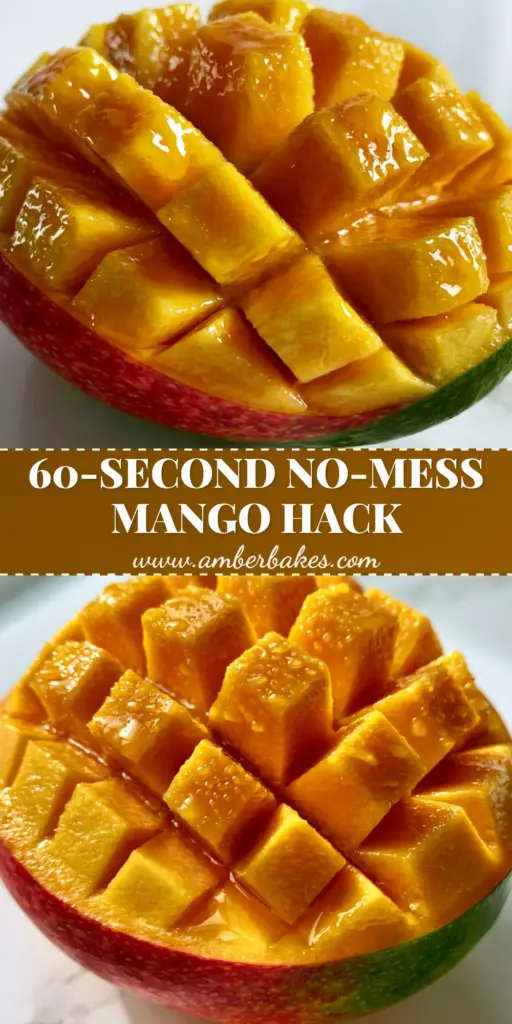
Visualizing the perfect fresh mango experience involves more than just taste; it is about the aesthetic precision of a vibrant golden-orange flesh carved into a flawless cross-hatch grid. We are aiming for those sharp, clean edges and a buttery, fiber-free texture that practically melts on the tongue. In this guide, I will show you how to achieve the professional “hedgehog” inversion on a clean white marble surface, ensuring you get every drop of glistening nectar without the usual sticky mess.
The Culinary Appeal of the Precision-Cut Mango
- Symmetry and Style: The inverted hedgehog shape creates a stunning 3D architectural look that elevates any fruit platter.
- Brix-Level Sweetness: By selecting fruit at the peak of ripeness, you ensure the highest natural sugar content and a “buttery” mouthfeel.
- Zero-Mess Technique: Our specific methodology keeps the juice on the fruit and off your countertops.
- Versatile Applications: Cleanly cut cubes are the foundation for everything from a sophisticated fresh mango dessert to vibrant savory salads.
The Sensory Science of Selecting a Ripe Mango
To achieve the visual result seen in our professional photography, you must start with the right raw material. Not all fresh mango varieties are created equal when it comes to the “hedgehog” cut. You want to look for varieties like Kent or Keitt, or the golden Ataulfo, which are known for their lack of stringy fibers. A fiber-free mango allows your knife to glide through the flesh, creating those sharp, geometric cubes that look so striking on a minimalist marble background.
When shopping, do not rely on color alone, as some fresh mango cultivars stay green even when ripe. Instead, use your sense of touch. Give the fruit a gentle squeeze; it should have some “give,” similar to a ripe avocado or peach. Avoid fruit that is mushy or has shriveled skin, as this indicates the fruit is overripe and the internal structure has begun to collapse into a pulp, making clean cuts impossible.
Finally, use your nose. A high-quality fresh mango will emit a strong, sweet, and slightly musky aroma at the stem end. This scent is a direct indicator of the nectar-like juice droplets you see glistening in our visual blueprint. If it has no smell, it isn’t ready. If it smells sour or fermented, it has gone too far.
Essential Tools for Precision Tropical Carving
To replicate the macro-photo finish of our fresh mango, you need the right equipment. Using a dull blade will bruise the delicate golden-orange flesh and result in ragged edges rather than the sharp, clean grid we desire. Accuracy in the kitchen starts with the right kit.
You will need a sharp 8-inch (20cm) Chef’s knife for the initial “cheek” cuts and a smaller 3.5-inch (9cm) paring knife for the intricate cross-hatch work. A stable cutting surface is also vital. While our photos feature a white marble surface for aesthetic depth, I recommend a heavy wooden or composite board for the actual cutting to prevent the fruit from sliding. Keep a damp microfiber cloth nearby to wipe the blade between cuts—this ensures no sticky residue accumulates, maintaining that “zero-mess” promise.
The Ingredients for a Perfect Fruit Presentation
While the fresh mango is the star of the show, a few foundational “invisible” ingredients can enhance the visual and structural integrity of your dish. To get that ultra-glistening look, a light spritz of citrus can act as a natural glaze while preventing oxidation.
- 1 Large Ripe Mango: Look for the red-to-green gradient skin and a firm but yielding feel.
- 1 tsp (5ml) Fresh Lime Juice: The acidity brightens the flavor and enhances the “nectar” appearance of the fruit.
- A Pinch of Flaky Sea Salt (Optional): Scientifically, a tiny amount of salt suppresses bitterness and amplifies the perception of sweetness in the fresh mango.
Mastering the Iconic Mango Hedgehog Technique
Step 1: Locating the Pit and the “Cheek” Cut
Position your fresh mango vertically on the cutting board, stem-side down. The pit of a mango is large, flat, and oval-shaped, running right through the center. To get the maximum amount of golden-orange flesh, you need to slice just a fraction of an inch away from the center line. Hold the fruit firmly and slice downwards in one fluid motion to remove the “cheek.” Repeat on the other side. You should now have two beautiful, oval halves of fruit and the center pit section.
Step 2: The Precision Cross-Hatch Grid
Take one mango cheek and hold it in the palm of your hand (if you are experienced) or place it skin-side down on the board. Using your paring knife, cut 3-4 longitudinal lines into the flesh, being careful not to pierce the skin. Then, cut 3-4 latitudinal lines to create a square grid. To achieve the “sharp, clean edges” seen in our visual prompt, ensure your knife is perpendicular to the fruit and cut in a single, confident stroke without “sawing” the flesh.
Step 3: The Inversion (The “Hedgehog” Moment)
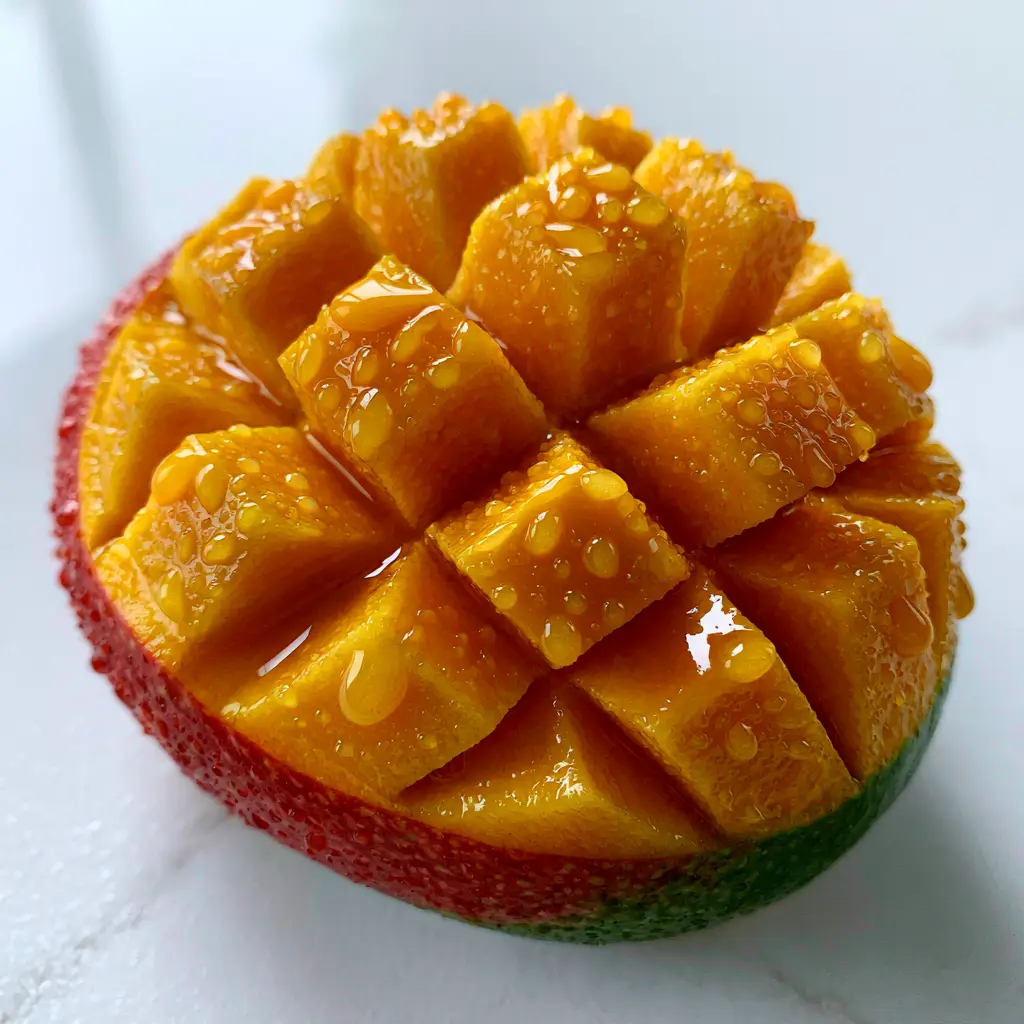
This is where the magic happens. Pick up the sliced cheek with both hands, placing your thumbs on the skin side and your fingers on the edges of the flesh. Gently but firmly push the center of the skin upwards with your thumbs while pulling the edges back. The fresh mango cubes will “pop” outward, separating from each other to create the hedgehog shape. As the skin stretches, you will see the glistening fresh fruit nectar pool slightly at the base of the cubes, just like in our photo.
Expert Tips for Success
- Temperature Control: For the cleanest cuts, chill your fresh mango in the refrigerator for 20 minutes before slicing. Cold fruit is structurally firmer and easier to carve.
- Variety Matters: If you want that “buttery, fiber-free” texture, prioritize Honey (Ataulfo) mangos. They have a smaller pit and a remarkably smooth consistency.
- The Glass Trick: If you prefer cubes without the skin for different mango recipes, you can use the rim of a sturdy drinking glass to scoop the flesh away from the skin in one movement after the hedgehog inversion.
- Avoid the Pit: If your knife hits resistance, you’ve found the pit. Don’t force it; simply slide the knife slightly further out and try again.
The Science of Ripening Your Fresh Mango at Home
If you have purchased a fresh mango that is still quite firm, don’t worry. You can accelerate the ripening process by placing the fruit in a brown paper bag at room temperature. Mangos release ethylene gas, and the bag traps it, speeding up the transition from starchy and tart to sweet and “buttery.”
Check the fruit daily. Once it yields to gentle pressure and gives off that signature tropical scent, it is ready for the marble-surface presentation. For those looking for more ways to use their perfectly ripe fruit, consider exploring delicious recipes for ripe mangoes that highlight the fruit’s natural sugars.
What to Pair With Your Precision-Cut Mango
The beauty of a fresh mango is its ability to cross the line between sweet and savory. While wonderful on its own, it serves as a brilliant component in more complex dishes. You can toss these perfect cubes into a vibrant fruit salsa to serve over grilled fish, or use them as a topping for fluffy mango pancakes during your Sunday brunch.
For a refreshing lunch, try adding the mango cubes to an Asian chicken salad. The sweetness of the fruit perfectly balances the saltiness of soy sauce and the heat of ginger. If you are hosting a summer BBQ, a fresh mango hedgehog makes a stunning garnish alongside a strawberry pretzel salad or even a zesty macaroni salad.
Frequently Asked Questions
Yes, but it is best served within 1-2 hours. If prepping ahead, spritz with a little lime juice and store in an airtight container in the fridge to keep the nectar glistening.
Keep the skin on while making your grid cuts. The skin provides grip. Also, ensure your hands and the knife handle are dry to maintain a firm hold.
A ripe mango will yield slightly to a gentle squeeze and emit a strong, sweet tropical aroma at the stem end. The skin may also show a red/orange blush.
Ataulfo (Honey) or Kent mangos are best because they are virtually fiber-free, allowing for the sharp, clean edges seen in professional photography.
Stringiness is usually a trait of certain varieties like the Tommy Atkins. To avoid this, look for ‘fiberless’ varieties at the market.
The Perfect Fresh Mango Preparation
Fresh Mango: The Ultimate Guide to the Perfect Mess-Free Hedgehog Cut
Ingredients
Equipment
Method
- Stand the fresh mango vertically. Slice downwards about 1/4 inch from the center to remove the 'cheek', avoiding the large flat pit. Repeat on the other side.
- Using a paring knife, cut a grid pattern into the flesh of the cheek. Ensure you cut down to the skin but do not pierce through it, maintaining sharp clean edges.
- Gently press the skin side upwards with your thumbs to invert the mango. The cubes will pop out into a hedgehog shape, releasing glistening nectar.
Notes
Use a high-quality paring knife to avoid bruising the buttery, fiber-free flesh.
Closing & Call to Action
Mastering the art of the fresh mango hedgehog cut transforms a simple piece of fruit into a culinary masterpiece. With the right selection of a fiber-free variety and a sharp knife, you can create a zero-mess, high-impact snack that looks as good as it tastes. The glistening nectar and vibrant golden-orange cubes are a testament to the beauty of fresh, seasonal produce.
I would love to see your mango creations! Did you manage to get those sharp, clean edges? Let me know in the comments below. If you found this guide helpful, please share it and save this technique to your favorite boards on Pinterest so you can find it next time you bring home a tropical haul.